快速开始
前言
注意
当前支持语雀 Token 模式(需要语雀超级会员)和账号密码模式(不需要任何会员)
文档站点工具汇总
文档站点搭建指南
点击 Vuepress官网 根据教程进行建vuepress项目
或者
点击 Vuepress-theme-hope 官网 根据教程进行建vuepress项目
安装依赖
在项目根目录下运行命令安装依赖:
npm install新建本地调试文件
在项目根目录中复制.elog.example.env文件并改名为.elog.env,此文件将用于本地同步文档时使用。
配置语雀
参考示例知识库,选择或新建语雀文档知识库,并按照文档提示配置语雀并获取token login repo。并在本地.elog.env中写入。
注意
Token 模式或者账号密码模式二选一即可,默认为账号密码模式,如果需要切换为 Token 模式,则修改elog.config.js中的platform为yuque 如果是用密码模式则修改为 yuque-pwd;对应平台进行修改即可
# 语雀(Token方式)
YUQUE_TOKEN=获取的Token

#语雀(账号密码模式)
YUQUE_USERNAME=一般是手机号
YUQUE_PASSWORD=登录密码

# 语雀公共参数
YUQUE_LOGIN=获取的login
YUQUE_REPO=获取的repo
不看示例可以参考这里
elog安装
npm install @elog/cli -gelog初始化到项目
elog init修改 elog.config.js 文件 platform , deploy , image内容 具体的.md文档地址和图片地址配置按照个人喜好去设置就行
module.exports = {
  write: {
    platform: 'yuque-pwd',
    // platform: 'yuque',
    yuque: {
      token: process.env.YUQUE_TOKEN,
      // baseUrl: '',
      login: process.env.YUQUE_LOGIN,
      repo: process.env.YUQUE_REPO,
      onlyPublic: false,
      onlyPublished: true,
    },
    'yuque-pwd': {
      username: process.env.YUQUE_USERNAME,
      password: process.env.YUQUE_PASSWORD,
      login: process.env.YUQUE_LOGIN,
      repo: process.env.YUQUE_REPO,
      onlyPublic: false,
      onlyPublished: true,
    },
    notion: {
      token: process.env.NOTION_TOKEN,
      databaseId: process.env.NOTION_DATABASE_ID,
      filter: false, // {property: 'status', select: {equals: '已发布'}}
    },
    feishu: {
      type: 'space',
      wikiId: process.env.FEISHU_WIKI_ID,
      folderToken: process.env.FEISHU_FOLDER_TOKEN,
      appId: process.env.FEISHU_APP_ID,
      appSecret: process.env.FEISHU_APP_SECRET,
    },
    flowus: {
      tablePageId: process.env.FLOWUS_TABLE_PAGE_ID,
      filter: false, // {property: 'status',value: '已发布'}
    },
    wolai: {
      token: process.env.WOLAI_TOKEN,
      pageId: process.env.WOLAI_PAGE_ID,
    }
  },
  deploy: {
    platform: 'local',
    local: {
      outputDir: './src/_yuque',// 输出目录
      filename: 'title',// 文件名
      format: 'markdown',// markdown
      catalog: true,// 目录
      frontMatter: {// 前端元数据
        enable: true,
        include: ['categories', 'tags', 'title', 'date', 'updated', 'permalink', 'cover', 'description'],
        // include: ['title', 'shortTitle', 'date', 'icon', 'star', 'isOriginal', 'cover', 'category', 'tag'], // 更新字段列表
        timeFormat: true,// 时间格式化
      }
    },

    halo: {
      endpoint: process.env.HALO_ENDPOINT,
      token: process.env.HALO_TOKEN,
      policyName: process.env.HALO_POLICY_NAME,
      rowType: 'html',
      needUploadImage: true,
    },
    confluence: {
      user: process.env.CONFLUENCE_USER,
      password: process.env.WORDPRESS_PASSWORD,
      endpoint: process.env.WORDPRESS_ENDPOINT,
      spaceKey: process.env.CONFLUENCE_SPACE_KEY,
      rootPageId: process.env.CONFLUENCE_ROOT_PAGE_ID, // 可选
    },
    wordpress: {
      username: process.env.WORDPRESS_USERNAME,
      password: process.env.WORDPRESS_PASSWORD,
      endpoint: process.env.WORDPRESS_ENDPOINT,
    }
  },
  image: {
    enable: true,
    platform: 'local',
    local: {
      outputDir: './src/_yuque/_images',// 图片输出目录
      prefixKey: '_images',// 图片路径前缀
      pathFollowDoc: true,// 图片路径是否跟随文档路径
      // imagePathExt : "",// 图片路径拓展点
    },

    oss: {
      secretId: process.env.OSS_SECRET_ID,
      secretKey: process.env.OSS_SECRET_KEY,
      bucket: process.env.OSS_BUCKET,
      region: process.env.OSS_REGION,
      host: process.env.OSS_HOST,
      prefixKey: '',
    },
    cos: {
      secretId: process.env.COS_SECRET_ID,
      secretKey: process.env.COS_SECRET_KEY,
      bucket: process.env.COS_BUCKET,
      region: process.env.COS_REGION,
      host: process.env.COS_HOST,
      prefixKey: '',
    },
    qiniu: {
      secretId: process.env.QINIU_SECRET_ID,
      secretKey: process.env.QINIU_SECRET_KEY,
      bucket: process.env.QINIU_BUCKET,
      region: process.env.QINIU_REGION,
      host: process.env.QINIU_HOST,
      prefixKey: '',
    },
    upyun: {
      user: process.env.UPYUN_USER,
      password: process.env.UPYUN_PASSWORD,
      bucket: process.env.UPYUN_BUCKET,
      host: process.env.UPYUN_HOST,
      prefixKey: '',
    },
    github: {
      token: process.env.GITHUB_TOKEN,
      user: process.env.ELOG_GITHUB_USER,
      repo: process.env.ELOG_GITHUB_REPO,
      prefixKey: '',
    }
  }

}
本地调试
配置完成后在根目录下;在项目根目录运行同步命令:
elog sync -e .elog.env在根目录创建文件夹 scripts 新建updateFrontMatter.js文件脚本;这个指令代码是将elog 的 FrontMatter 匹配 到 Vuepress 的 FrontMatter 进行兼容
const fs = require('fs');
const path = require('path');

// 定义要处理的目录
const outputDir = './src/_yuque';

// 递归读取目录中的所有 Markdown 文件
function processDirectory(directory) {
    fs.readdir(directory, { withFileTypes: true }, (err, entries) => {
        if (err) {
            console.error('Error reading directory:', err);
            return;
        }
        entries.forEach(entry => {// 处理目录中的每个条目
            const entryPath = path.join(directory, entry.name);// 获取完整路径
            if (entry.isDirectory()) {// 处理子目录
                processDirectory(entryPath); // 递归处理子目录
            } else if (entry.isFile() && path.extname(entry.name) === '.md' && entry.name !== 'README.md') {// 处理 Markdown 文件
                processFile(entryPath);
            }
        });
    });
}

// 处理单个 Markdown 文件
function processFile(filePath) {
    fs.readFile(filePath, 'utf8', (err, content) => {
        if (err) {
            console.error('Error reading file:', err);
            return;
        }

        // 解析现有的 frontMatter
        const frontMatterMatch = content.match(/^(---[\s\S]*?---)/m);// 匹配 frontMatter
        if (!frontMatterMatch) {
            console.error('No front matter found in file:', filePath);
            return;
        }
        let frontMatter = frontMatterMatch[1];

        // 获取 title 值以便在 shortTitle 缺失时使用
        const titleValue = getFieldValue(frontMatter, 'title') || '默认标题';
        // 获取 date 值并只保留日期部分
        // const existingDate = getFieldValue(frontMatter, 'date');
        // const dateValue = existingDate ? existingDate.split(' ')[0] : new Date().toISOString().split('T')[0]; // 获取 date 值并只保留日期部分

        const existingDate = getFieldValueData(frontMatter, 'date');
        const dateValue = existingDate ? existingDate.split(' ')[0] : new Date().toISOString().split('T')[0]; // 获取 date 值并只保留日期部分
        console.log("dateValue", dateValue);
        // 创建新的 frontMatter 字段
        const newFrontMatter = `
---
title: ${titleValue}
shortTitle: "${getFieldValue(frontMatter, 'shortTitle') || titleValue}"
date: ${dateValue}
icon: ${getFieldValue(frontMatter, 'icon') || 'blog'}
star: ${getFieldValue(frontMatter, 'star') !== null ? getFieldValue(frontMatter, 'star') : 'false'}
isOriginal: ${getFieldValue(frontMatter, 'isOriginal') !== null ? getFieldValue(frontMatter, 'isOriginal') : 'false'}
cover: "${getFieldValue(frontMatter, 'cover') || ''}"
category:
- ${getFieldValue(frontMatter, 'category') || 'yuque'}
tag:
- ${getFieldValue(frontMatter, 'tag') || 'yuque'}
---
`.trim();

        // 替换原有的 frontMatter
        const newContent = content.replace(frontMatter, newFrontMatter);

        // 写回文件
        fs.writeFile(filePath, newContent, 'utf8', err => {
            if (err) {
                console.error('Error writing file:', err);
                return;
            }
            console.log(`Updated file: ${filePath}`);
        });
    });
}

// 辅助函数,从现有的 frontMatter 中获取字段值
function getFieldValue(frontMatter, fieldName) {
    const regex = new RegExp(`^${fieldName}:\\s*([^\n]+)`, 'm');
    const match = frontMatter.match(regex);
    return match ? match[1].trim() : null;
}
function getFieldValueData(frontMatter, fieldName) {
    const regex = new RegExp(`^${fieldName}:\\s*['"]?([^'"\n]+)['"]?`, 'm');
    const match = frontMatter.match(regex);
    return match ? match[1].trim() : null;
}

// 开始处理指定目录
processDirectory(outputDir);
启动 Vuepress
在项目根目录运行 Vuepress 启动命令,打开本地链接。
npm run server配置 Vuepress 博客
根据 Vuepress 文档和 Hope 主题配置文档,配置你的博客直到你满意为主,你也可以换别的主题,这里不做演示
提交代码到 github
本地访问没问题直接提交所有文件到 Github 仓库即可
部署到 Vercel
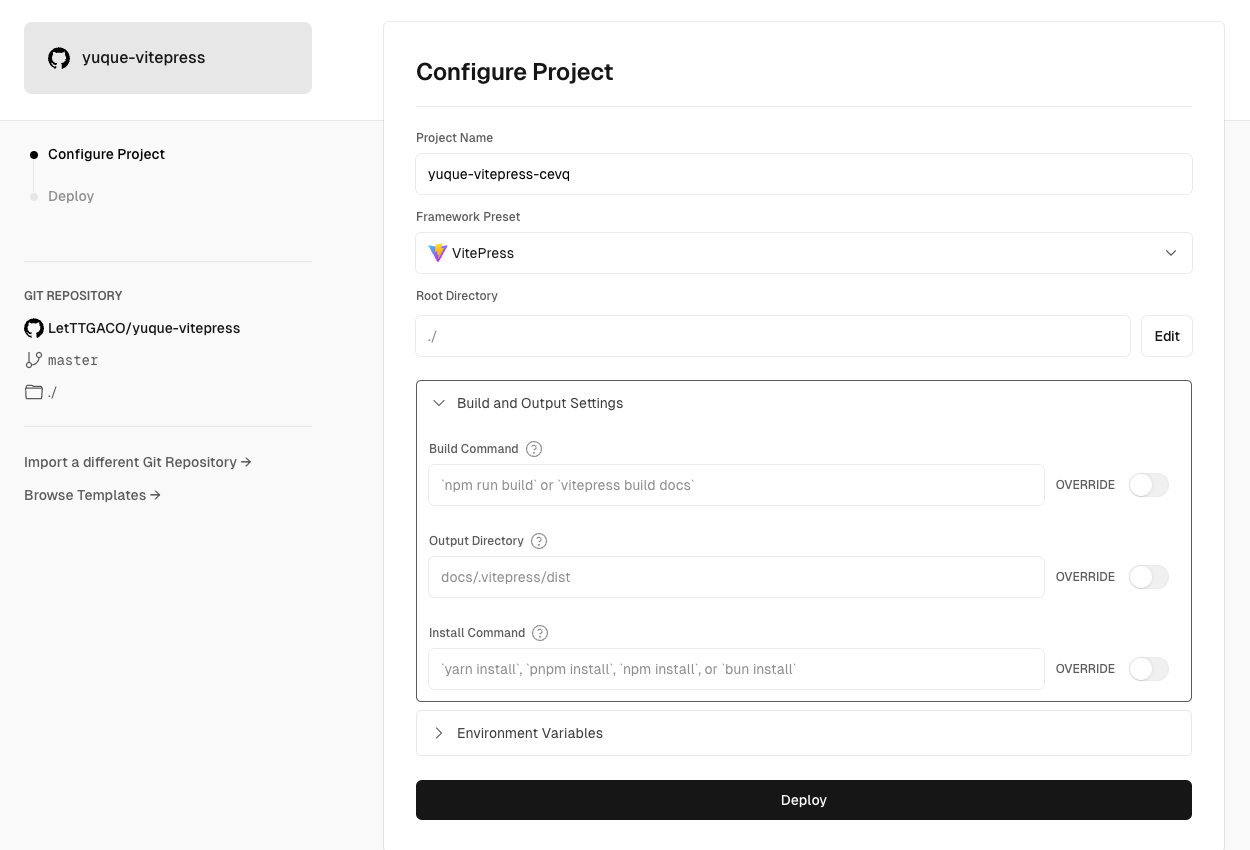
注册 Vercel 账号并绑定 Github,在 Vercel 导入 该项目,Vercel 会自动识别出该 VitePress 项目,不需要改动,直接选择 Deploy 部署。部署完成会有一个 Vercel 临时域名,你也可以绑定自己的域名。

自动化同步&部署
注意
注意:在非国内CI/CD环境中使用账号密码模式登录语雀,例如Github
Workflow,会导致语雀后台登录设备中出现大量美国IP,目前尚不清楚语雀是否会有安全限制措施,请谨慎使用。推荐本地同步时使用。
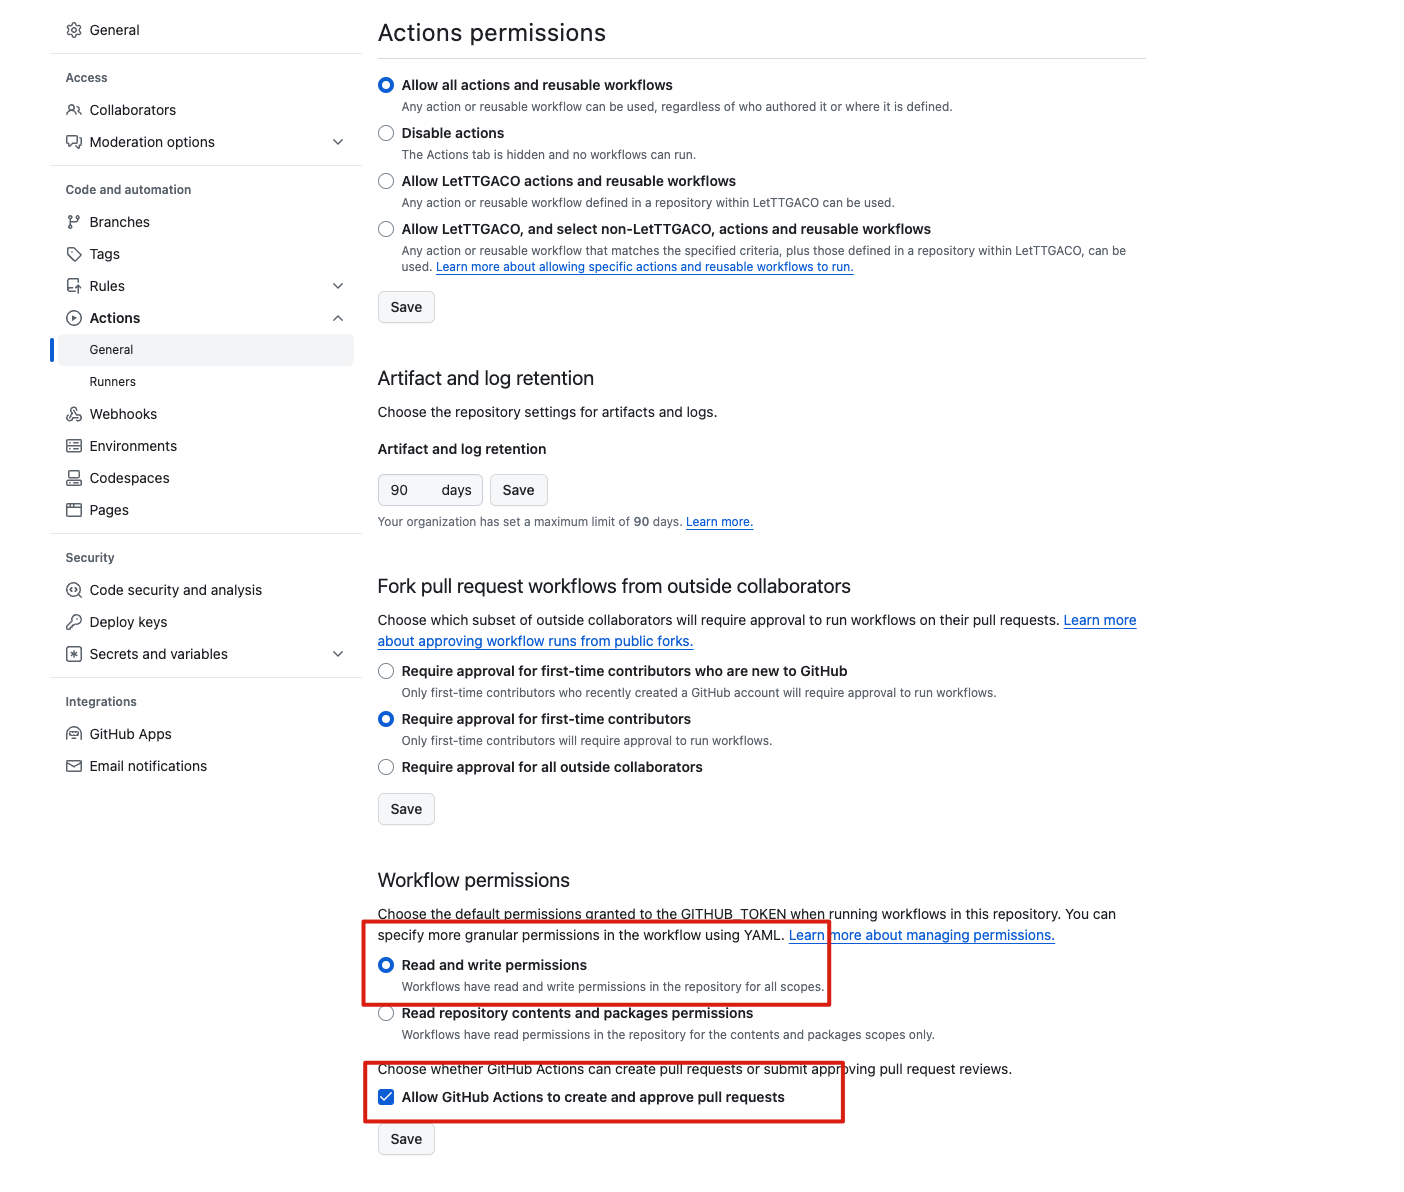
检查 Github Actions 权限
在 Github 仓库的设置中找到 Actions-General,打开流水线写入权限Workflow permissions

配置环境变量
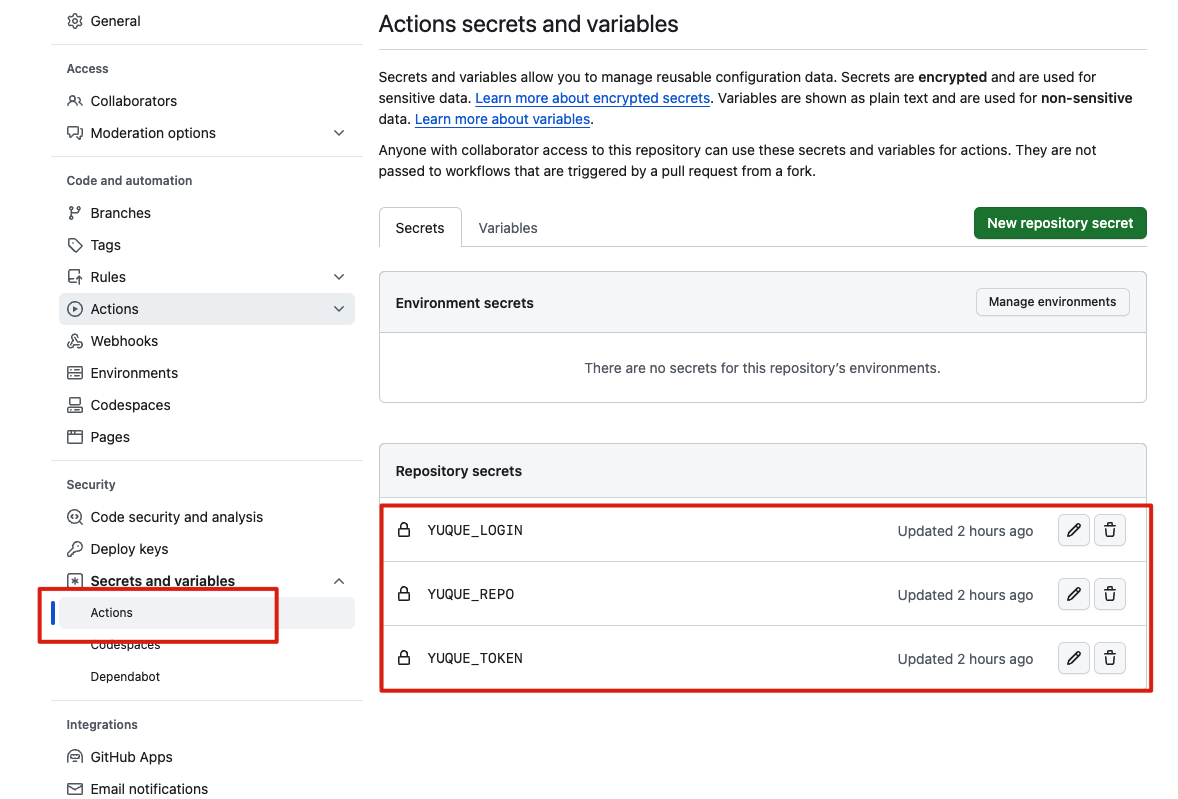
在本地运行时,用的是.elog.env文件中定义的语雀账号信息,而在 Github Actions 时,需要提前配置环境变量。
在 Github 仓库的设置中找到 Secrets and variables,新增仓库的环境变量和.elog.env保持一致即可

自动化部署
当在语雀中改动文档后,手动/自动触发 Github Actions流水线,会重新从语雀增量拉取文档,自动提交代码到 Github 仓库。
Vercel 会实时监测仓库代码,当有新的提交时都会重新部署博客。如此就实现了自动化部署博客。
整个流程的关键点就在于:如何手动/自动触发 Github Actions。
在项目.github/workflows/sync.yaml中已经配置了外部 API 触发 Github Actions 事件,所以只需要调用 API 触发流水线即可。
手动触发
为了方便,这里提供一个部署在 Vercel 的免费公用的ServerlessAPI,按照文档配置好 URL 参数并浏览器访问即可触发流水线
https://serverless-api-elog.vercel.app/api/github?user=xxx&repo=xxx&event_type=deploy&token=xxx自动触发-语雀 webhooks
注意
需要语雀专业会员
在语雀知识库 - 更多设置 - 消息推送中可配置语雀 webhooks,填写上面的 Vercel Serverless API。当文档更新时,语雀会调用这个API进行推送,进而触发 Github Actions
注意
注意:语雀是国内文档平台,调用国外Vercel 的服务可能会失败,可自行部署 API
注意
注意:知识库配置了「自动发布」功能后,文档的 更新/发布 操作暂不会发送 webhooks
参考示例
示例 Github 仓库:待完善
示例语雀知识库:https://www.yuque.com/ziming-rrjvu/crg0xg/execk2ysh7x0fr4w?singleDoc# 《快速开始》
示例文档站点:待完善


